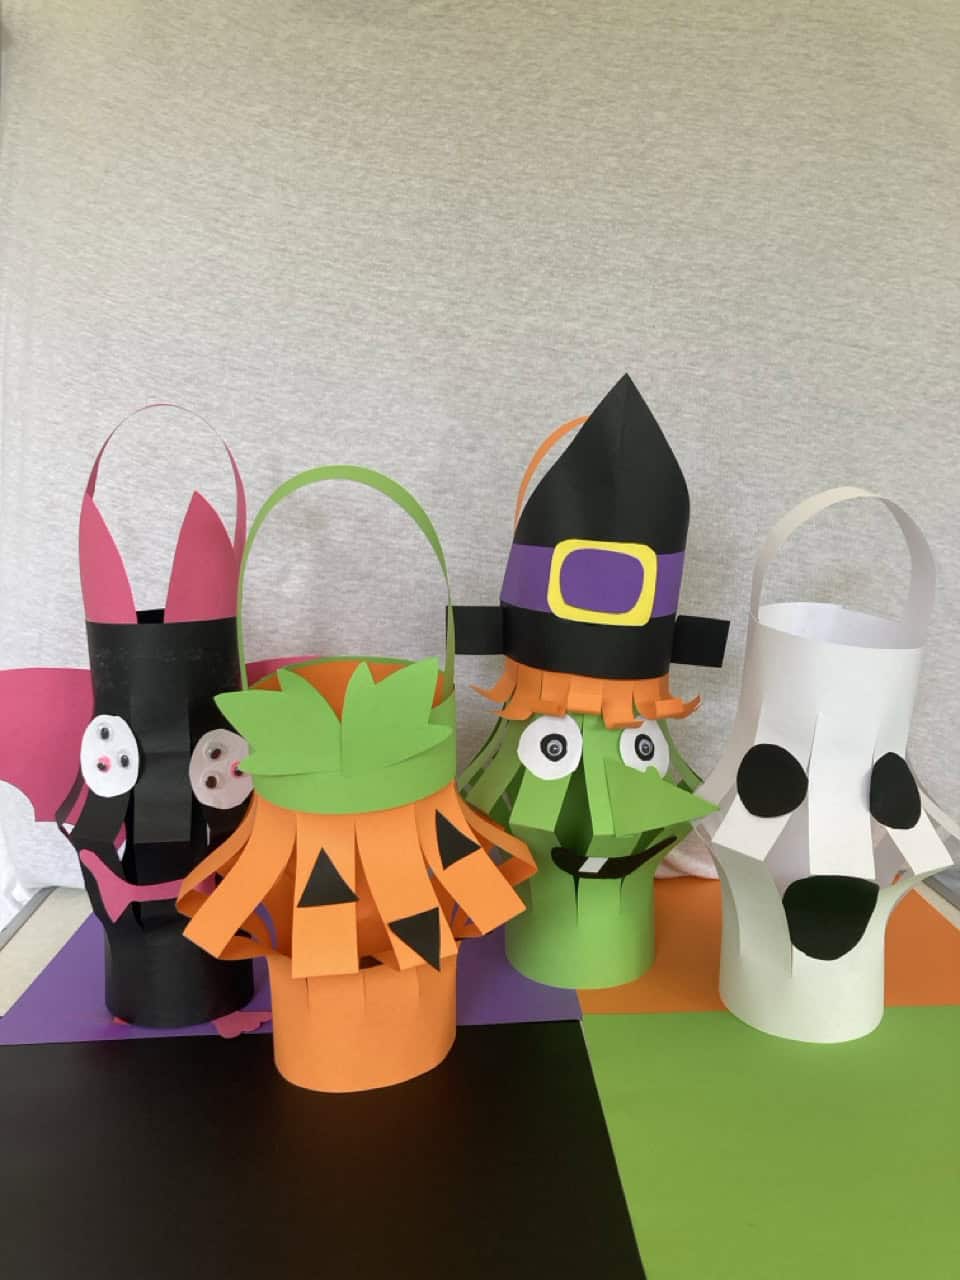
🎃 Easy Halloween Lantern DIY Ideas You Can Totally Make 👻

We’re a digital nomad family of four—two adventurous kids (5 and 2), and two creative parents—living part-time in the Netherlands and Southern Europe. Around this time of year, our days get cozier, our nights glow warmer, and our crafting table gets taken over by glitter, glue, and giggles. One of our favorite traditions? Halloween Lanterns DIY! They’re simple, fun, and bring spooky joy to any fall night.
This post is all about Easy DIY Halloween Decorations that light up your home with charm—not chaos. Whether you’re hosting a party, decorating your porch, or just having a cozy crafting session with your little ones, these Halloween Lantern Decor ideas will spark joy. Grab your paper, scissors, and glue—it’s time for Lantern Crafts you’ll actually want to display.
👻 Ghost Lantern
Halloween Lantern DIY

Let’s start with the cutest spooky classic: the Ghost Lantern. This is one of our go-to Halloween Paper Crafts for Kids, especially on rainy afternoons. It’s quick, low-mess, and uses materials you likely already have. You can even turn this into a glowing Halloween Prop DIY by adding a battery-operated tea light.
You’ll need:
- 1 sheet white A4 paper (preferably thick paper)
- Black construction paper
- Child-safe scissors
- Glue stick (we love the Elmer’s washable one!)
- Pencil
- Optional: battery tea light for glow
This is a great choice for Chinese Lantern Craft for Kids because of its simple folding steps and spooky-fun decorating.
Step-by-step Instructions 🖐
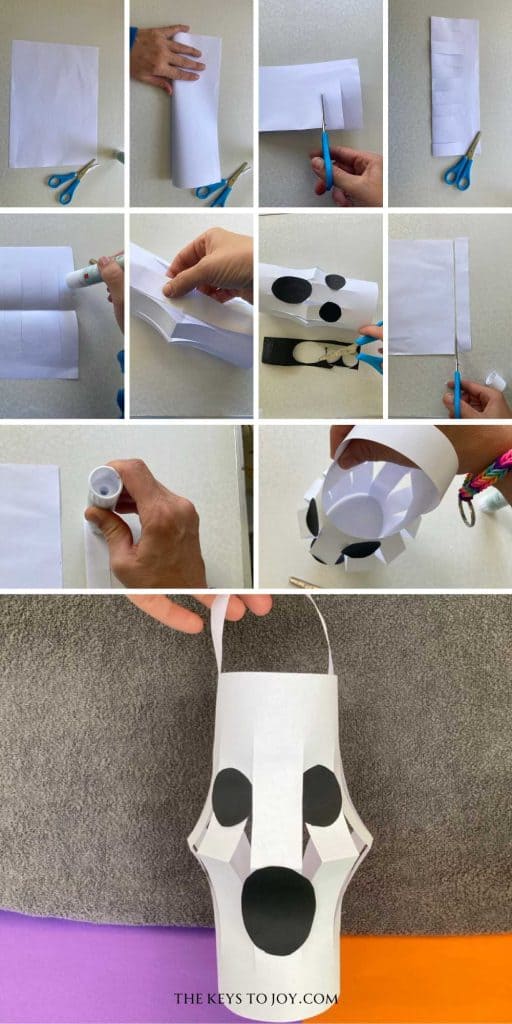
Step 1: Start with a sheet of white paper.
Step 2: Cut a 2 cm strip off the long edge. This will be your lantern handle.
Step 3: Fold the remaining paper in half lengthwise.
Step 4: Use scissors to cut vertical lines from the fold up—stop 2–3 cm before the top edge. Space the cuts evenly.
Step 5: Unfold the paper to reveal the slits.
Step 6: Add glue along one short edge of the paper.
Step 7: Roll the paper into a tube and press the glued ends together to hold.
Step 8: Cut ghost face shapes (eyes and mouth) from black paper.
Step 9: Glue the ghost face onto the lantern.
Step 10: Glue the paper strip to the top edges as a handle. Done!
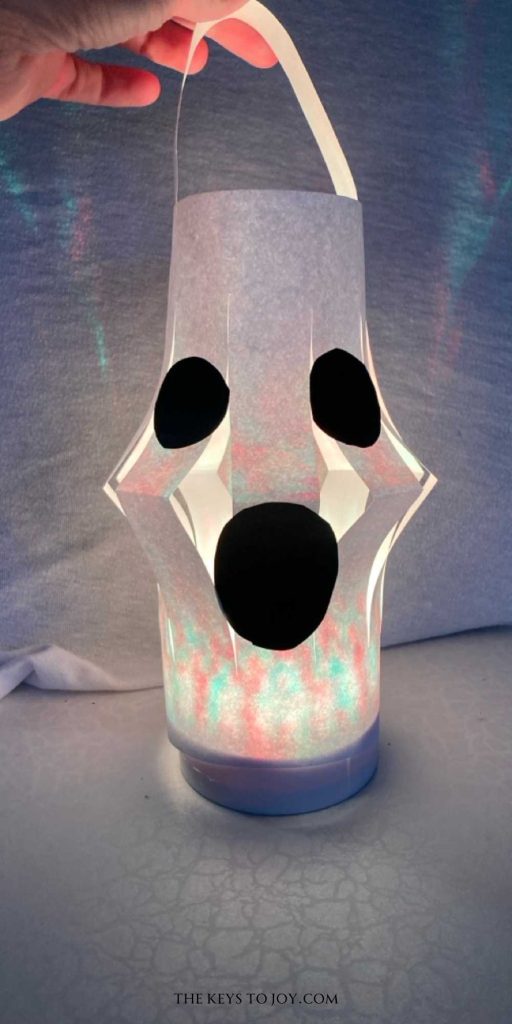
🎉 Your Halloween Lanterns DIY ghost is ready to haunt (adorably)! It’s perfect for indoor play, party decor, or windowsill ambiance. If you’re using this as part of a Dollar Tree Lantern project, just add a flameless tea light and watch it glow.
🧙♀️ Witch Lantern
Halloween Lanterns DIY
This Witch Lantern is a showstopper—and one of our kids’ absolute favorite DIY Halloween Projects. It’s quirky, a little spooky, and full of personality. Whether you’re crafting after school or setting up your Halloween Lantern Decor, this paper lantern will charm every visitor… even the grumpy goblins.
It’s part of our rotating Halloween Paper Crafts for Kids, and a fun twist on the classic Chinese Lantern Craft for Kids—with a spooky, sparkly makeover!
You’ll need:
- 1 sheet green construction paper
- Small scraps of black, white, and orange paper
- Child-safe scissors
- Glue stick
- Pencil
- Optional: googly eyes, orange glitter paper, or craft embellishments for the hat and hair
Step-by-step Instructions 🧙
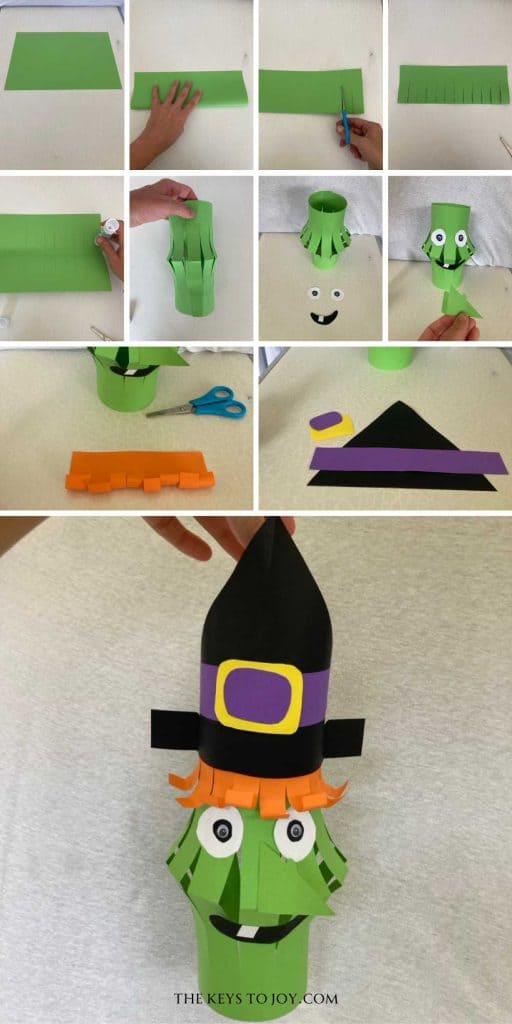
Step 1: Lay your green sheet flat.
Step 2: Cut a 2 cm strip from the long edge (for the handle).
Step 3: Fold the remaining sheet in half lengthwise.
Step 4: Cut slits from the folded edge upward—leave 2–3 cm at the top.
Step 5: Unfold and glue along one short end.
Step 6: Roll the paper into a cylinder shape and press the glued edges together.
Step 7: You now have the base of your lantern!
Step 8: Add big white eyes and draw or glue small black pupils. We used Lantern Designs with layered cutouts and Dollar Tree Lantern materials like googly eyes.
Step 9: Cut a wide, goofy mouth from black paper and add a tiny white tooth.
Step 10: Fold and glue on a witchy nose—just a green triangle with some fold for dimension.
Step 11: For hair, cut a strip of orange paper and fringe it with little snips. Curl a few pieces using scissors or your finger for bounce. Glue it to the top edge of the lantern.
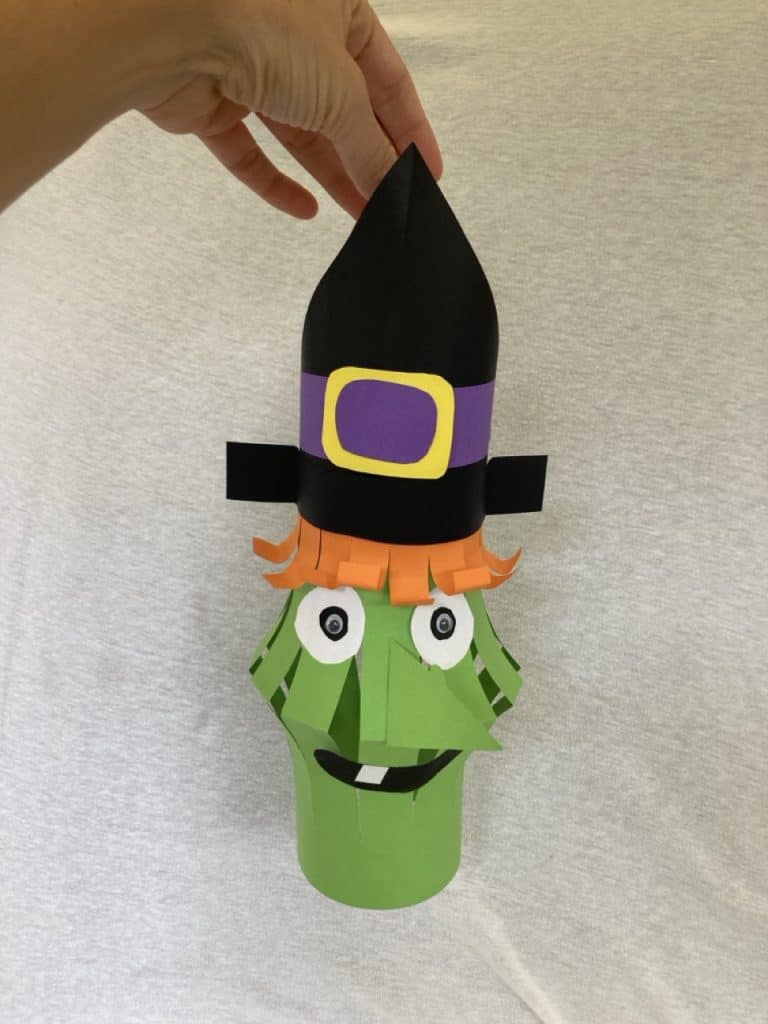
Step 12: Time to accessorize! Cut a witch hat shape from black paper. Add a purple band and a yellow buckle for extra flair. These details elevate your Lantern Designs into standout Halloween Props DIY.
Step 13: Glue the hat to the top of your witch’s head. Ta-da! You’ve created a whimsical, not-too-spooky Halloween Lantern DIY masterpiece.
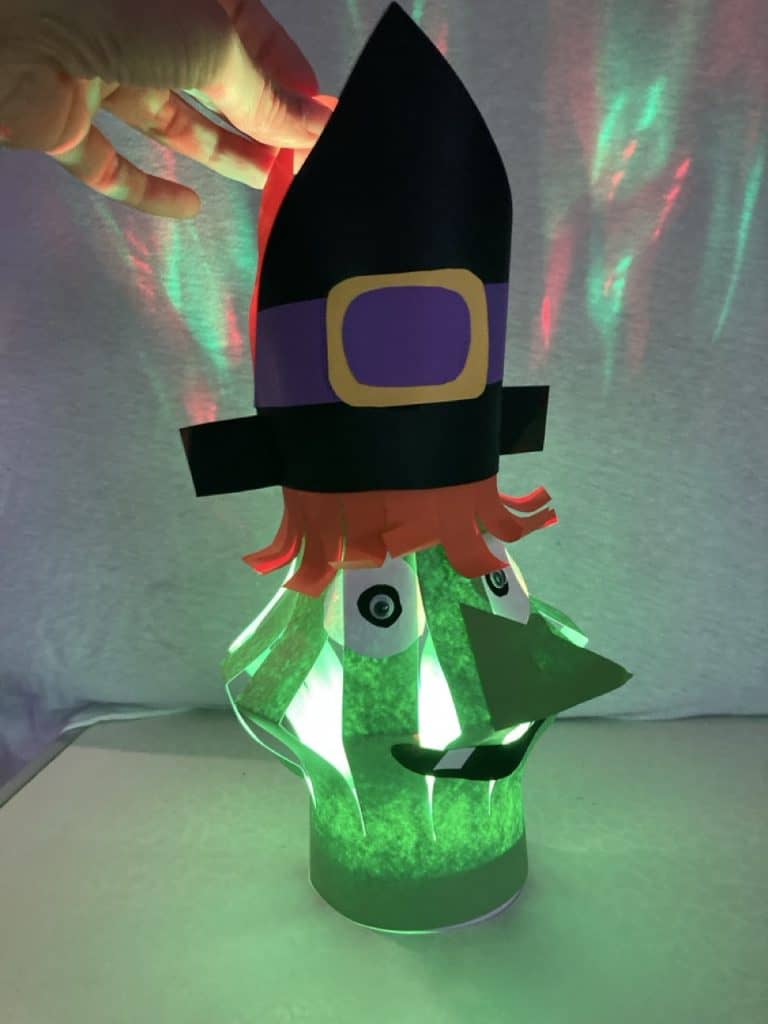
💚 This project is one of our top picks for Easy DIY Halloween Decorations. It’s budget-friendly, fun, and full of charm. You can even pop in a flameless tea light for an eerie green glow during your next movie night or party.
If you’re crafting with kids, this one’s a winner for Halloween Paper Crafts for Kids or classroom creativity. And if you’re a Cricut fan, you could totally upgrade this with a Halloween Paper Lantern Cricut file for more precision and flair.
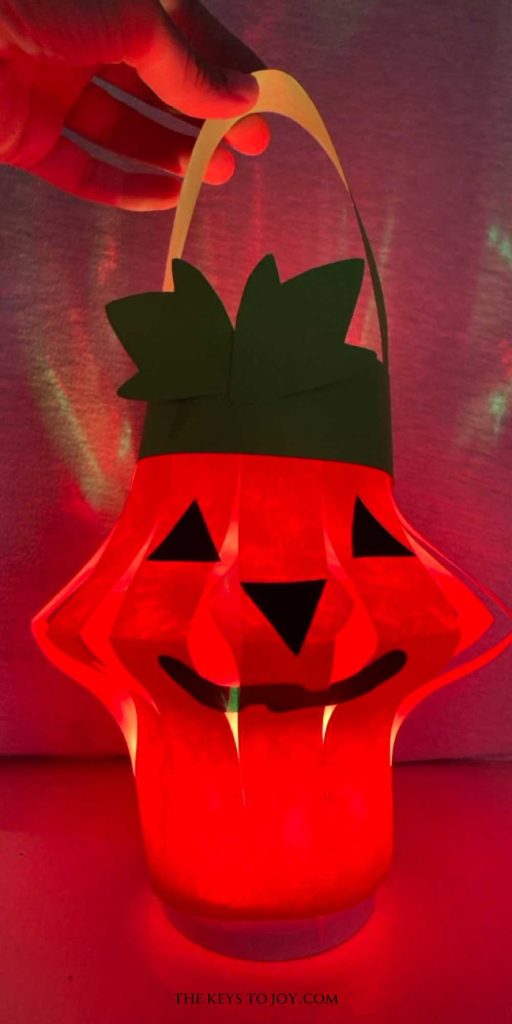
🎃 Pumpkin Lantern
Halloween Lanterns DIY
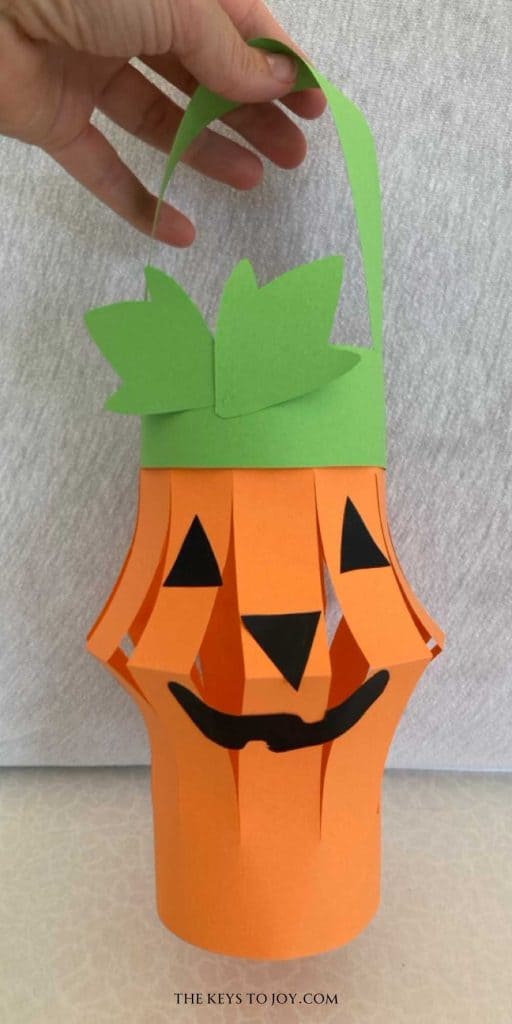
Nothing says Fall Lanterns like a classic Jack-o’-lantern glow—except maybe one made entirely out of paper! This adorable Pumpkin Lantern is fun, quick, and kid-approved. Perfect for hanging in a window, carrying at dusk, or adding to your Easy DIY Halloween Decorations collection.
It’s one of our top choices for a Halloween Lanterns DIY night with the kids. And it’s a perfect match for anyone looking for Halloween Paper Crafts that don’t require fancy tools—just joy and a little imagination.
You’ll need:
- 1 sheet of orange paper
- 1 small sheet of green paper
- Black paper scraps for the face
- Glue stick
- Child-safe scissors
- Pencil
Optional: a flameless tealight or battery-operated LED light to make it glow. Great for Dollar Tree Lantern setups!
Step-by-step Instructions 🎨
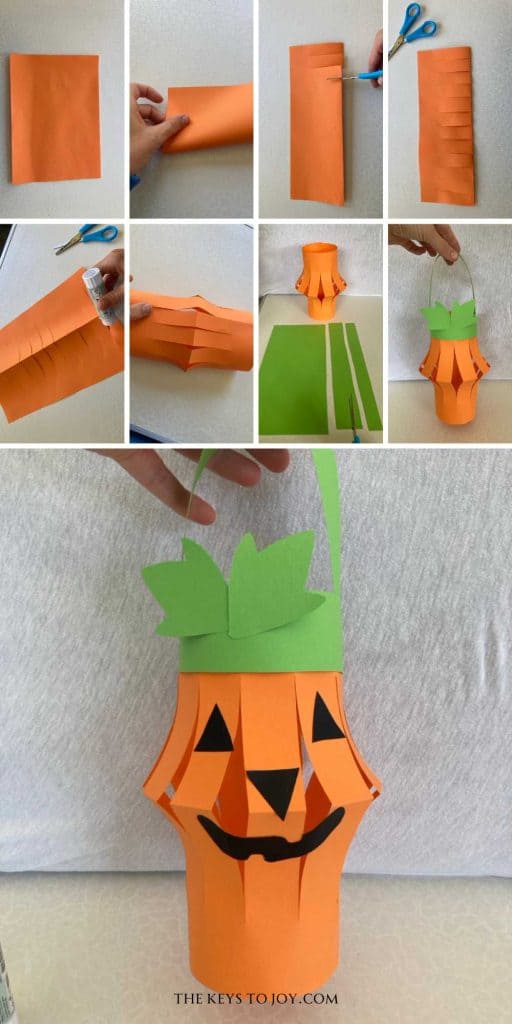
Step 1: Start with a full sheet of orange paper.
Step 2: Cut a strip off the long edge (about 2 cm wide) to use later as your handle.
Step 3: Fold the paper in half lengthwise.
Step 4: Cut evenly spaced slits from the folded edge up—stop 2–3 cm before the top.
Step 5: Open the sheet back up.
Step 6: Glue along one of the short edges.
Step 7: Roll the paper into a tube and press to secure the glue. You now have your pumpkin base!
Step 8: From green paper, cut leaf shapes and a wide band to wrap around the top. This will form the “pumpkin top.”
Step 9: Add the green handle strip using glue on the inside edges. This completes your Paper Lantern Decor setup!
Step 10: Finally, cut out black triangles for the eyes and nose, and a wavy smile for the mouth. Glue them on to create your pumpkin face.
This DIY is full of creative joy, and the finished lantern looks amazing anywhere—mantelpiece, porch, or party table. You can also scale this down for a Chinese Lantern Craft for Kids party favor or classroom project.
✨ For extra flair, upgrade with glitter glue, sequins, or a patterned face. Want more precise cutting? Use your Halloween Paper Lantern Cricut to level it up.
🦇 Bat Lantern
Halloween Lanterns DIY
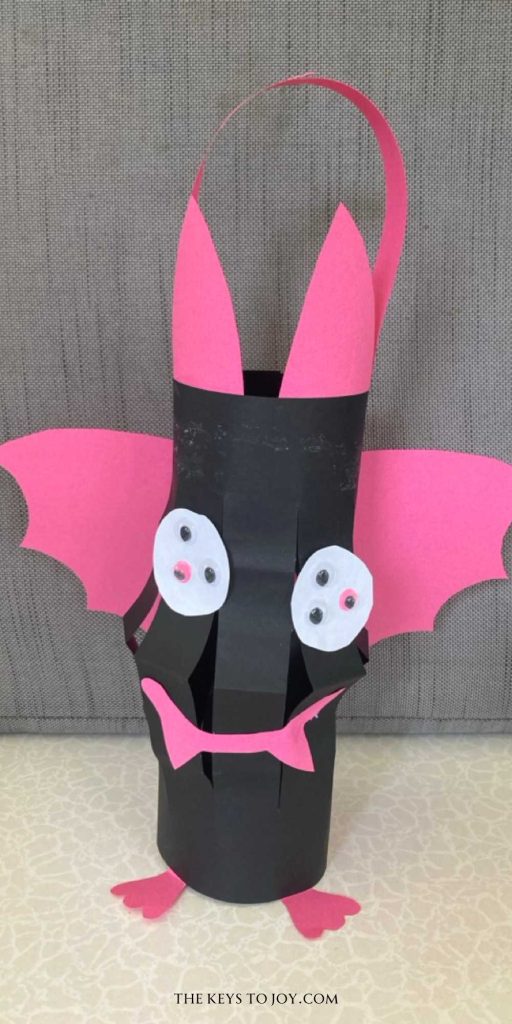
Say hello to this fang-tastic Bat Lantern—a fun and slightly spooky paper project perfect for your DIY Halloween Projects list. Our kids had the best time flapping around the house with these! It’s a cool mix between a Halloween Prop DIY and a sweet handmade lantern that’s surprisingly easy to make.
The finished look? A glowing black bat with flappy wings, giant googly eyes, and a goofy grin. Whether you’re decorating the porch or prepping for a classroom party, this one’s a keeper for your Halloween Lantern Decor stash!
You’ll need:
- 1 black sheet of construction paper
- White and red paper scraps
- Optional: Googly eyes, double-sided tape, glow-in-the-dark stickers, or mini LED light
- Glue stick
- Scissors
- Pencil
Step-by-step Instructions 🦇
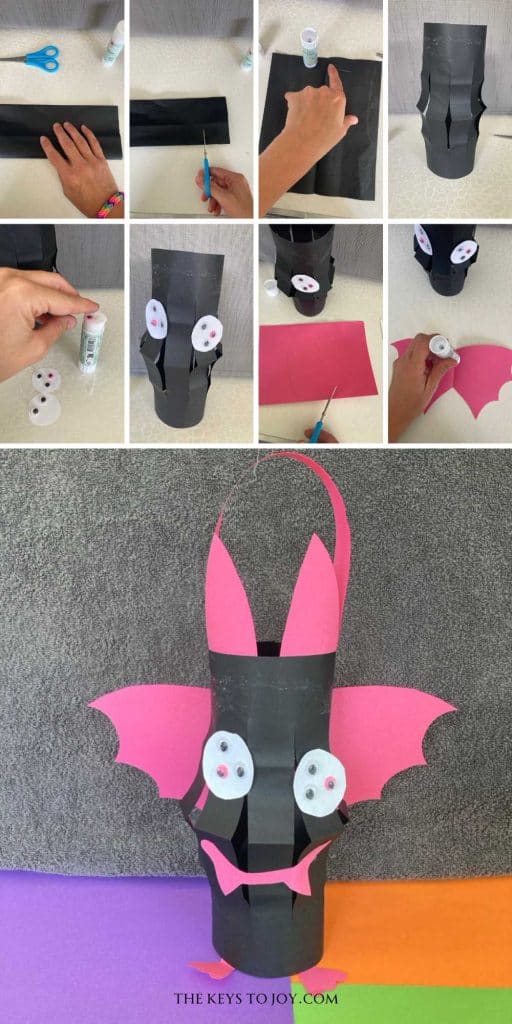
Step 1: Start with a black sheet. Cut off a 2 cm strip from the long side for your handle.
Step 2: Fold the remaining sheet in half lengthwise.
Step 3: Cut slits from the folded edge up—leave about 2–3 cm at the top.
Step 4: Unfold and glue one short edge.
Step 5: Curl the paper into a cylinder and press the glued edges together. This is your lantern body.
Step 6: Cut out 2 large white eyes (or use googly eyes) and glue them on.
Step 7: Create a small mouth with two white fangs from white paper and a red oval for the tongue.
Step 8: Cut two large bat wings from black paper. Use curved triangle shapes with wavy edges to mimic wing flaps.
Step 9: Glue the wings onto the sides of the lantern. They should stick out proudly!
Step 10: Attach the black handle strip to the inside of the lantern. You now have a bat buddy ready for flight!
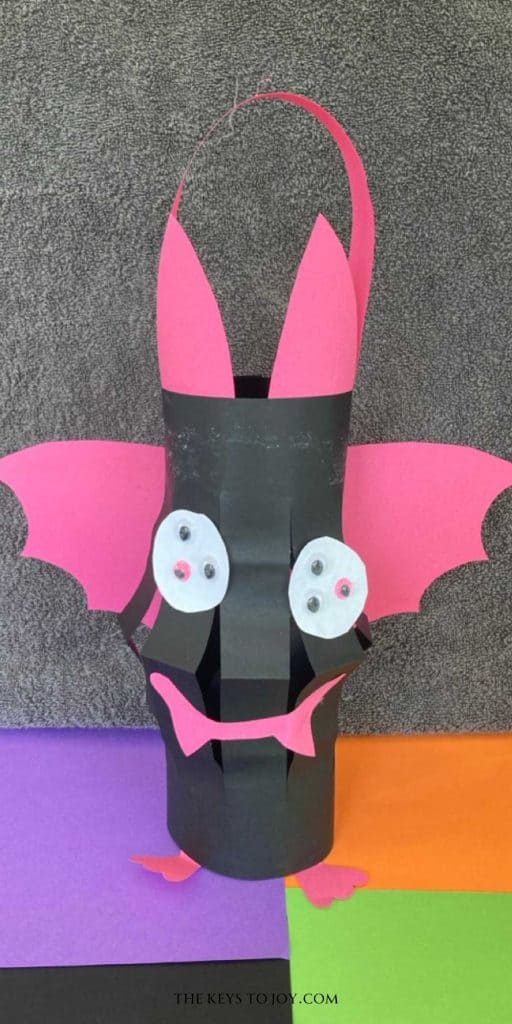
This is one of our go-to Halloween Paper Crafts for Kids because it’s so expressive. My eldest love to fly with bat and make up fantasty stores with the entire halloween lantern team.
You can also enhance this with Halloween Paper Lantern Cricut designs or cutouts for precision. Want to take it up a notch? Add tiny feet and hang upside-down from a doorway using double-sided tape—a fun surprise for your Paper Lantern Decor setup!
🕯️ Your Halloween Lantern Parade Starts Here!
How fun was that? Whether you made the bat, witch, pumpkin, or monster—these Halloween lanterns are perfect for parades, decorating, or spooky playtime!
Ready for even more Halloween joy?
- 51 Easy & Fun Halloween Party Ideas for Kids 🎃
- 40+ Outdoor Activities For Kids: Spark Joy in Every Season